Export Images: Slice and export website images
Slicing Tutorial to slice & export the website's images with Adobe Fireworks CS4+
Once you have created your web page design using Adobe Fireworks CS4+ you need to learn to export the design as smaller image parts (JPEG and GIF files) that will be used to re-create the website design in your resulting web pages.

As part of our free CSS website design guide this tutorial teaches you the very important step of how to slice and export the simple website layout designed in previous steps (shown on your left) to optimized images usable for your website when you build the web pages with Adobe Dreamweaver CS4+ in subsequent steps.
You Are Here ::: Home >> Free Tutorials >> Website design with Dreamweaver CS4+ & Fireworks CS4+ >> Site Layout Design
Step 3: Slicing and Exporting the website images with Fireworks CS4+
So far you have learnt how to design the website's layout using Adobe Fireworks CS4+. Once you have completed your website design, you need to slice and export the designed images from Fireworks CS4+.
Slicing the Design in Adobe Fireworks CS4+
The term slicing means to cut the a designed image into smaller pieces for optimal use as smaller images download more quickly over the web. Rather than waiting for one large image to download, a web page would load faster if it consisted of several smaller images that load simultaneously into the browser to display the design. In addition, slicing makes it possible to optimize various parts of a document differently.
Web Layer: In Adobe Fireworks CS4+ the slices are stored in the Web Layer located as the first layer in the Layers panel. The Web Layer is always on the topmost layer in any document.
-
Step 1: In our designed layout you are going to take slices for the design elements in the header, footer and navigational links menu. The text in the content area needs to be ignored as it isn't needed as images (just make the "content" layer invisible). Before that we recommend you save a copy of your PNG file as a backup of the original design.
-
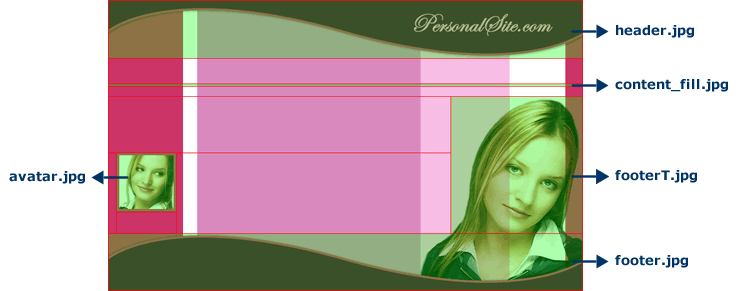
Step 2: Now, select the header curve (unlock the header and footer layer first) and insert a slice on it. To do this go to Edit > Insert > Rectangular Slice. A rectangular slice is inserted on top of the header part. Fireworks CS4+ Slices have a green overlay by default. The slice created will have a default slice name of “layout_r1_c1”; rename the slice as "header". The slice name should make sense when you export it as an image. The slice name will display under the Properties Inspector (Window >> Properties).
-
Step 3: Similarly create slices for the footer curve and photos (The girl's photo that is displayed on the right bottom and under the links) - name the footer slice "footer", the smaller photo slice "avatar" and the bottom photo slice "footerT". While taking the slice for the footer photo modify the slice using the Scale Tool
 to cover only the head portion that is seen above the footer slice (without overlapping) - refer to the image below that illustrates this. Since the remaining body portion is covered in the footer slice, you don’t need to take slice for the whole image.
 -
Step 4: The final slice we need to take is for the website's vertical fill image. A fill image is a small part of a repeatitive design and is used as a background image to repeat and cover the entire area it is the background of. You will need to hide the navigation layer (i.e. the links) before taking this slice. Select the Slice Tool
 and drag-draw a slice the width of the design document 900 pixels and height 5 pixels. name the slice "content_fill". The illustration below shows how the parts of the design are sliced and named:
Note: Make sure none of the slices overlap each other as in the figure above. To check this you can zoom in by pressing Ctrl + (plus) and to zoom out by pressing Ctrl - (minus). -
Step 5: Open the Optimize Panel (Window >> Optimize or press F6) and select each slice using the Pointer Tool
 and select file type "JPEG - Better Quality". Now set the Quality as 100.
Exporting Images from Adobe Fireworks CS4+
To export images means to convert and save the sliced design parts as GIF or JPEG files for further use.
- Step 1: Go to File > Export, the Export window will pop-up.
- Step 2: In the Save in field first select a local folder on your computer as the website's root folder - now create a new folder called images inside it in which to export the sliced images - select the images folder by entering it. The Export field will have the HTML and Images option selected by default, change this to Images Only; select Export Slices for the Slices option; Untick the option Include areas without slices. See the illustration below that will show the Export window. Now click the Export button and your sliced images will be exported and saved in the selected images folder.
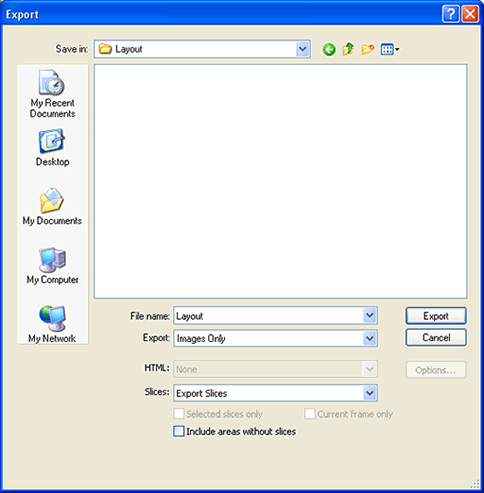
Export Window Settings: Adobe Fireworks CS4 Screenshot
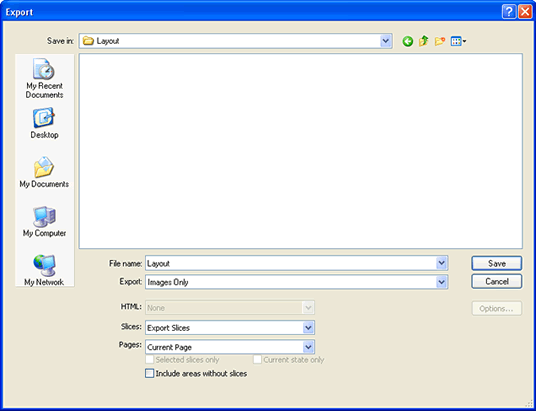
Export Window Settings: Adobe Fireworks CS4+ Screenshot
Good Job! You have now successfully sliced and exported the website's images. The next step is to set up your website in Adobe Dreamweaver CS4+ .
Place photos & content into the website design || Continue to Step 4: Setting up your website in Dreamweaver CS4+
This free website design tutorial series teaches layout design with Adobe Fireworks CS4+ and CSS/XHTML website conversion with Adobe Dreamweaver CS4+. Learn CSS Web Design by following these simple steps:
- Introduction: Design a Website
- Layout Design: Design your website layout with Adobe Fireworks CS4+
- Export Images: Slice and Export your website images with Adobe Fireworks CS4+
- Dreamweaver Site: Set-up your website in Adobe Dreamweaver CS4+
- CSS Tutorial: CSS & XHTML Programming to build your website with Adobe Dreamweaver CS4+
- CSS Styles: Format your web site text using CSS style sheets in Adobe Dreamweaver CS4+
Software Required
Compatible Versions of Fireworks for this Tutorial
Note: For uses of lower versions of Fireworks, screenshot images may differ. Please read the CS3 and below version of this web design tutorial series - How to make a Website. Recommended Version: Fireworks CS6