Site Navigation Design Ideas
Website navigation tips for advanced users and design with Fireworks CS4+
In this design tutorial you are going to learn advanced website navigation using Adobe Fireworks CS4+. A navigation bar is a group of buttons that provide links to different areas of a website. It generally remains constant throughout the site. The below images illustrate the navigation designs you are going to learn:
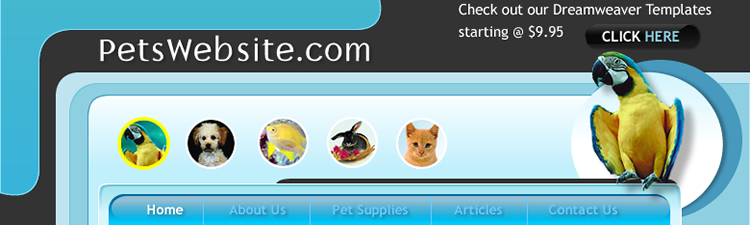
Glass Effect Navigation
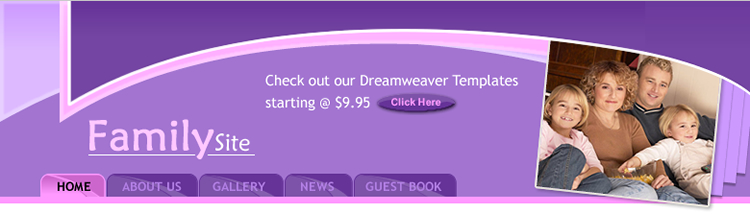
Advanced Tabbed Navigation
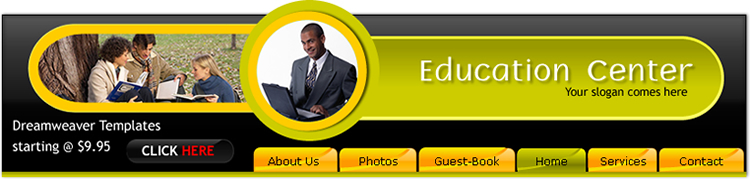
Advanced CS4 Tabbed Navigation
Prerequisite Knowledge
This tutorial teaches you how to design slightly more complex website navigations using Adobe Fireworks and thus assumes you are familiar with some design software, even if you are new to Adobe Fireworks. However be assured that our detailed instructions can be followed by even a total novice to graphic design. We also recommend that beginners read and practice our simple navigation ideas first to be able to easily follow and create these advanced designs.
You Are Here ::: Home >> Free Tutorials >> Adobe Fireworks CS4+ Tutorials >> Adobe Fireworks CS4+ Website Navigation Design Ideas
Glass Effect navigation bar with Adobe Fireworks CS4+
Open Fireworks and create your base design over which you are going to place the navigational bar. Or you can first create the navigational elements and then design around it.
Designing the Glass Effect Bar
- Step 1:
Draw a rounded rectangle using Rounded Rectangle Tool
 set Fill Color as #006699 and Stroke Color as none. While the Rounded rectangle is still selected, choose the following option:
a. Select the Fill color go to Fill category >> select Gradient >> Choose Linear option.
b. Now click the Fill color, and then click on the small color rectangle that is on the left side and set its color to #006699.
c. After that, click on the small color rectangle that is on the right side and set its color to #00CCFF. The image below shows the linear effect: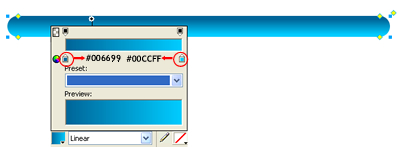
- Step 2: Again draw another Rounded Rectangle place over the previous Rounded Rectangle and set the Fill color as #FFFFFF and stroke as none.
- Step 3:
Select the Rounded rectangle and choose the following option:
a. Select the Fill color go to Fill category >> select Gradient >> Choose Linear option
b. Now click the Fill color, and then click on the small color rectangle that is on the left side and set its color to #FFFFFF and set the Opacity to 58.
c. After that, click on the small color rectangle that is on the right side and set its color to #FFFFFF and set the Opacity to 0. See the illustration below that will show we have placed the rounded rectangle: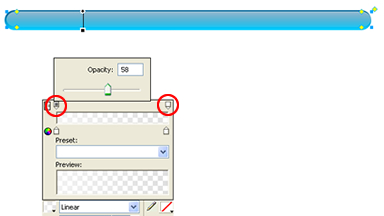
- Note: In Adobe Fireworks CS5 you can reverse the gradients using Reverse Gradients

- Step 4:
Click the Text Tool
 , choose Font – Trebuchet MS, Font Size - 14, Color - #FFFFFF, Font Weight - bold, Anti-aliasing level - Smooth Anti-Alias and write any text (as you like). Select the Pen Tool
  set Stroke color as #66CCFF and divide the navigation bars.
Note: Make sure that the Stroke Category is Pixel hard (Pencil>>1-Pixel hard). The Glass effect will look as below:
set Stroke color as #66CCFF and divide the navigation bars.
Note: Make sure that the Stroke Category is Pixel hard (Pencil>>1-Pixel hard). The Glass effect will look as below:

- Step 1: Create a rounded rectangle using Rounded Rectangle Tool set Fill color as #663399 and stroke color as #663399.
- Step 2: To create a tab from the rounded rectangle, drag and flattened the bottom two corners (learn how to flattened the bottom two corners) along with pressing the alt key. The tab design will look like this:

- Step 3: Duplicate the first tab and create four more tabs next to it with Fill Color as #663399 and Stroke Color as #663399. The tabs should now look like this:

- Step 4: Draw two curves (learn how to draw curves) using Pen Tool over the tab; set the fill colors as #663399, #8659AF and stroke color as #663399.
Select the Pen tool in the Tools panel. Click to place the first corner point over the tab. Move to the location of the next point, then click and drag to produce a curve point. Each time you click and drag, Fireworks extends the line segment to the new point. To close a path, click the first point you plotted. The beginning and end points of a closed path are the same. You can modify curved path segments by dragging their point handles. In the image below see how we have use the pen tool to draw a curve.


- Step 5:
Click the Text Tool , choose Font – Trebuchet MS, Font Size - 14, Color - #000000, Font Weight - bold, Anti-aliasing level - Smooth Anti-Alias and write any text (as you like).
- Step 1: Create a rounded rectangle using Rounded Rectangle Tool and select Plastic 088 from Plastic Styles.
- Step 2: To create a tab from the rounded rectangle, drag and flattened the bottom two corners along with pressing the alt key. The tab design will look like this:

- Step 3:
Duplicate the first tab and create four more tabs next to it. The tabs should now look like this:

- Step 4:
Draw a curve using Pen Tool over the tab, set the stroke color as #F6DF02 and fill color as none. While the stroke color is still selected choose the following options:
Gradient Settings: Adobe Fireworks CS4 Screenshot

Gradient Settings: Adobe Fireworks CS5 Screenshot
Using the above navigation we have designed a header portion (Click for the Swap Image tutorial).
Open Adobe Fireworks and create your base design over which you are going to place the navigational bar.
Designing the Tabbed Navigation
![]()
How to create advance navigation bars with Adobe Fireworks CS4+
In this web design tutorial series you are going to learn how to create advance navigation bars using Adobe Fireworks CS4+. A navigation bar is a group of buttons that provide links to different areas of a website. It generally remains constant throughout the site. The image below shows how we have created advanced navigations bars.
Advanced CS4 Tabbed Navigation
Open Adobe Fireworks CS4+ and create your base design over which you are going to place the navigational bar.
- Select the Fill color go to Fill category >> select Gradient >> Choose Linear option
- Now click the Fill color, and then click on the small color rectangle that is on the left side and set its color to #F6DF02.
- After that, click on the small color rectangle that is on the right side and set its color to #FF9900. See the illustration below that will show we have placed the curve:

- Step 5:
Click the Text Tool , choose Font – Verdana, Font Size - 12, Color - #000000, Anti-aliasing level - No Anti-Alias and write any text (as you like).

- You can also rollover the navigation using Simple Rollover Behavior (Click for the Rollover tutorial).
Use the above advanced navigation idea in a regular website design or use it display tabbed content as in the example below:
Related Tutorials: Drop Down menu | Simple Navigation Ideas
Software Required
Adobe Fireworks CS4+. If you are using the CS3 or below version please read Navigation Design Ideas for Advanced Users.
Compatible Versions of Adobe Fireworks for this Tutorial
Adobe Fireworks CS3 & below users: For lower versions of Fireworks, some features, steps and screenshot images may differ. Please read the CS3 & Below version of this free web design tutorial - Navigation Design Ideas for Advanced Users.
Recommended Version: Fireworks CS6