CSS
What is CSS
Cascading Style Sheets (CSS) are .css files that contain a collection of formatting rules that control the appearance of content in a web page. They are very useful for maintaining a web site since its appearance (controlled by properties of HTML tags) can be managed from just one file. CSS Styles also enhance your site's look, accessibility and reduces file size. Another main advantage is reusability - instead of defining the properties of fonts, backgrounds, borders, bullets, uniform tags, etc. each time you use them you can just assign the corresponding css style in the class property. You can store CSS styles directly in each document or, for more control and flexibility, in an external style sheet. This tutorial teaches you what CSS is and how to use CSS styles to format text in your website using CSS in Dreamweaver.
Prerequisite Knowledge
None. This tutorial teaches you the basics of CSS and thus requires no prior knowledge except how to setup a Dreamweaver Website.
You Are Here ::: Home >> Free Tutorials >> Dreamweaver Tutorials >> CSS Styles Tutorial
Types of CSS Styles
There are 4 types of CSS Styles:
- Class - Custom CSS style: creates a customized style with the set attributes. These class styles can be applied to any tag.
- ID - Single Element CSS style: redefine the formatting for a particular tag, such as <h2>. All text formatted with the h2 tag is immediately updated.
- Tag - HTML Tag CSS style:A specific ID attribute (for example, #myStyle applies to all tags that contain the attribute-value pair id="myStyle")
- Compound: A particular combination of of the above 3 types (for example, td h2 applies whenever an h2 header appears inside a table cell) and/or pseudo-class styles (for example, a:link, a:hover, a:visited)
Using CSS Styles
CSS styles are defined within the <style> tag.
If you define the styles embedded within your current document you will find code similar to the following in your head content:
<!--
.bluetext {font-family: Verdana, Arial, Helvetica, sans-serif; font-size: 10pt; color: #000066;text-decoration: none;} -> Example of Class style:- apply using class property for any tag <p class="bluetext">
h1 {specifications} -> Example of Tag style:- for tag <h1>
a:link {specifications} -> Example of pseudo-class Advanced style:- applied to all <a> tags without any other style
#NewsBox {specifications} -> Example of ID attribute Advanced style:- applied to the tag whose ID property is set to NewsBox
-->
</style>
If you define the style in a external existing or new Style Sheet (recommended) you will find code similar to the following in your head content:
This code indicates that the document is linking to the external style sheet called styles.css located under the site root. If you open the style sheet in notepad you will find code similar to the code for the styles being embedded in the document. The big advantage of external style sheets is that the web site is easy to maintain and that when we make changes to the styles applied in the document, only the style sheet needs to be uploaded and not all the pages accessing it. As a practice, while using Dreamweaver, link you template(s) to the external style sheet so that all the pages using the template can use just one style sheet.
Create a New CSS Style and Style Sheet
Open your site in Dreamweaver and do the following:
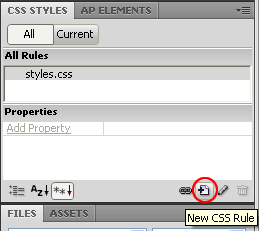
- Open any page of your site and select window > CSS Styles and Click the New CSS Style button (+ icon), a pop-up window will show up as shown below:
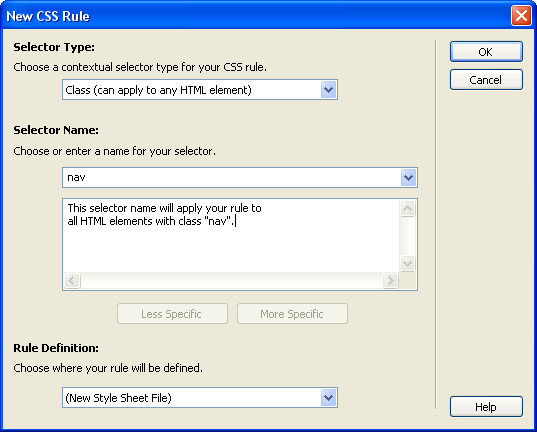
- Select Class in the Selector Type. Now type your style name in the Name box (example: nav). You can select any of the other three types of CSS Styles explained above too. Note: If you are using dreamweaver 8 and below Use the Tag Selector Type for redefining HTML tags or the Advanced Selector Type for hovers, id attributes or combination of tags.
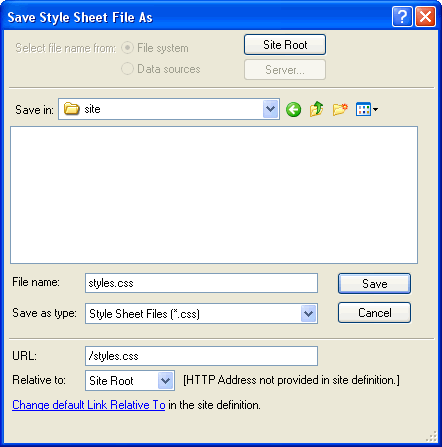
- Define the style in a New Style Sheet, give a name (example: styles.css) and save it under your site root. Click OK.
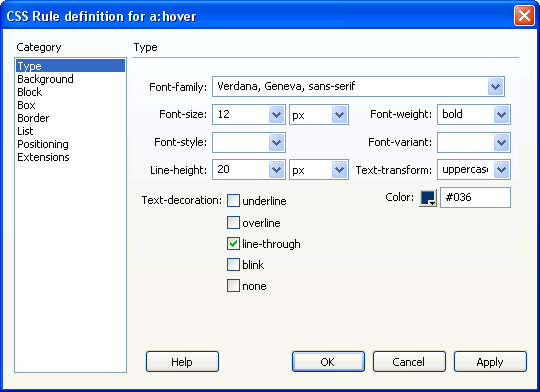
- In the CSS Style Definition pop-up window that appears give the Formatting Attributes like Font Family, Size, Color, Wight in the Type Category. Click on Background, Border, Positioning, etc. from the Category menu to set other available CSS appearance settings.
Applying the New Style
- To use this style just select and right click any tag in the tag selector located at the bottom left of the Document window. For the Set Class attribute select nav from the list.
- While typing the HTML code use styles by setting the class property for any tag (example: <ol class = "nav">).
Our Tutorial on CSS Text teaches the following Simple Text Effects using CSS Styles:
- Text Links Rollover
- Text Case Setting
- Text Spacing
- Line-through Effect
Our Tutorial on using Bullets in HTML or Deamweaver teaches how to use CSS Styles with bullets (shapes, decimal, roman-numerals, alphabetical and images).
Our Tutorial on Links without Underline teaches how to use CSS Styles to display links without the appearance of the underline.
Software Required
Adobe Dreamweaver (Macromedia Dreamweaver prior to version 8). Please check out the compatible versions listed in the box below. Since this tutorial series covers the core functions of Dreamweaver to format text in your web site using CSS styles, mostly any version of these software should be fine.
Compatible Versions of Dreamweaver for this Tutorial
Note: The instructions in this tutorial are same across all Dreamweaver versions listed above; Screenshot images (if any) may differ. Recommended Version: Dreamweaver CS6