Metallic Gold Effect
Gold metal text effect with Fireworks
In this tutorial you are going to learn how to create metallic gold text using Fireworks. The image below shows how we have created metallic gold effect.


Prerequisite Knowledge
This tutorial teaches you how to create a metallic gold effect using Fireworks and thus assumes you are familiar with some design software, even if you are new to Adobe Fireworks. However be assured that our detailed instructions can be followed by even a total novice.
You Are Here ::: Home >> Free Tutorials >> Fireworks Tutorials >> Metallic Gold EffectMetallic Gold Effect with Adobe Fireworks CS3 or below
Follow the steps given below:
Color Palette - Metallic Gold Effect
- Step 1: Open Fireworks and create a new file of size 500x500 pixels.
- Step 2:
Select the Text tool
 , choose Font – TW Cen MT, Font Size - 35, Color - #000000, Font Weight - bold, Anti-aliasing level - Crisp Anti-Alias and write any text (as you like).
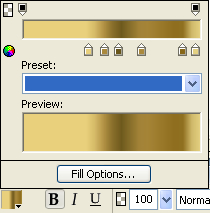
 - Step 3: Click on the color and select the Fill Option >> Fill category >> Gradient >> choose Linear. The gradient option will look as below:
- Step 4:
While the gradient color is still selected, choose the following options:
a. Now click the gradient color, and then click on the small color rectangle that is on the left side and set its color to #E9D07C.
b. After that, click on the small color rectangle that is on the right side and set its color to #E4D181.
c. Now add another four rectangle by clicking the ‘+’ symbol in between the two small color rectangle and set the colors as #AA893C, #68551A, #AA893C and #886718. See the illustration below that will show how to set the colors:
 - Step 5:
We recommend you to apply Inner Bevel effect, so that the text will look as silver. Select the text using Pointer Tool
 . Now on the right side of the properties window, you will find filters, click over the + symbol and choose Inner Bevel from Bevel and Emboss. Click on the tiny blue circle with "i" next to the Inner Bevel filter (Edit and arrange live filters button) and set the following values for the filter: Bevel edge shape – Flat, Width - 2, Contrast – 70%, Softness – 2, Angle – 135 and Button preset - Raised.
 - Step 6:
To apply Drop shadow again click the text using Pointer Tool . Now on the right side of the properties window, you will find filters, click over the + symbol and choose Drop Shadow from Shadow and Glow. Click on the tiny blue circle with "i" next to the Drop Shadow filter (Edit and arrange live filters button) and set the following values for the filter: Opacity – 49%, Softness – 0, Angle – 346, Distance – 2, Color - #E3CF7E. Again select the text and apply drop shadow, now set the values as Opacity – 50%, Softness – 0, Angle – 180, Distance – 2, Color - #E4D181. The Gold text will look as below:
- Step 1: Select the Text tool, choose Font – Belwe Bd BT, Font Size - 35, Color - #000000, Font Weight - bold, Anti-aliasing level - Smooth Anti-Alias and write any text.
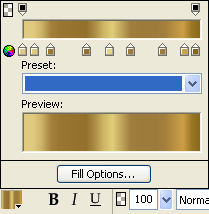
- Step 2: Click on the color and select the Fill Option >> Fill category >> Gradient >> choose Linear. The gradient option will look as below:
- Step 3:
While the gradient color is still selected, choose the following options:
a. Now click the gradient color, and then click on the small color rectangle that is on the left side and set its color to #E0CA7F.
b. After that, click on the small color rectangle that is on the right side and set its color to #886718.
c. Now add another seven rectangle by clicking the ‘+’ symbol in between the two small color rectangles and make the colors as #E0CA7F, #9A7733, #93702C, #E7D57F, #9D7B3C, #9D7B3C and #CEA146. See the illustration below that will show how to set the colors: - Step 4: To apply Drop shadow again click the text using Pointer Tool . Now on the right side of the properties window, you will find filters, click over the + symbol and choose Drop Shadow from Shadow and Glow. Click on the tiny blue circle with "i" next to the Drop Shadow filter (Edit and arrange live filters button) and set the following values for the filter: Opacity – 65%, Softness – 0, Angle – 315, Distance – 2, Color - #000000.
- Step 5: Draw a rectangle using Rectangle Tool set the Fill Color as #990000. Now place the golden text on the rectangle. See the illustration below that will show how we have placed the text:
- Step 1: Select the Text tool, choose Font – Trebuchet MS, Font Size - 50, Color - #000000, Font Weight - bold, Anti-aliasing level - Smooth Anti-Alias and write any text.
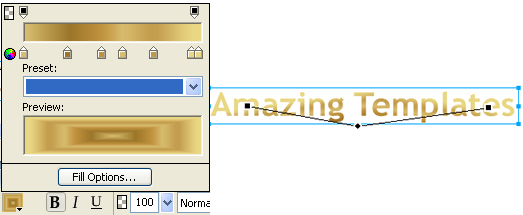
- Step 2: Click on the color and select the Fill Option >> Fill category >> Gradient >> choose Rectangle.
- Step 3:
While the gradient color is still selected, choose the following options:
a. Now click the gradient color, and then click on the small color rectangle that is on the left side and set its color to #D8BD70.
b. After that, click on the small color rectangle that is on the right side and set its color to #E9D784.
c. Now add another five rectangle by clicking the ‘+’ symbol in between the two small color rectangle and set the colors as #9B762A, #C1923D, #D8BD70, #C09848 and #E9D784. See the illustration below that will show how to set the colors: - Step 4: We recommend you to apply Inner Bevel effect. Select the text using Pointer Tool. Now on the right side of the properties window, you will find filters, click over the + symbol and choose Inner Bevel from Bevel and Emboss. Click on the tiny blue circle with "i" next to the Inner Bevel filter (Edit and arrange live filters button) and set the following values for the filter: Bevel edge shape – Smooth, Width - 3, Contrast – 100%, Softness – 3, Angle – 135 and Button preset - Raised. Again select the text and apply Drop Shadow, Click on the tiny blue circle with "i" next to the Drop Shadow filter (Edit and arrange live filters button) and set the following values for the filter: as Opacity – 100%, Softness – 3, Angle – 315, Distance – 4, Color - #000000. The gold effect will look as below:


Color Palette - Metallic Gold Effect

Let us see another example for Metallic Gold Effect.
Color Palette - Metallic Gold Effect
Software Required
Adobe Fireworks (Macromedia Fireworks prior to version 8). Please check out the compatible versions listed in the box below. Since this tutorial requires only basic tools of Fireworks to create metallic gold effect, using mostly any version of these software should be fine. If you are using the CS4 version of these software please read Metallic Gold Effect with Adobe Fireworks CS5.
Compatible Versions of Adobe Fireworks for this Tutorial
Adobe Fireworks CS4 & above users: If you are using Fireworks CS4+ please note that some features, steps and screenshot images may differ for the above tutorial. Please read the CS4+ version of this free web design tutorial - Metallic Gold Effect with Adobe Fireworks CS4+.
Recommended Version: Fireworks CS6