Fireworks Beginner Help & Reference
Fireworks for Beginners: Information on basic tools and techniques
Many of our tutorials assume that you know the bare basics of using the Fireworks software and can understand our instructions. However for someone extremely new to Fireworks, references to some tools might be confusing and hard to understand or find. Since they need a little more explaination and help to get around our tutorials we have put together this help page.
Read on for some handy information to learn Fireworks quickly.
Stroke and Fill Colors
- The Stroke Color and Fill Color are displayed in the Properties Inspector (Properties Window). See the image below that will show how the stroke color and fill color will appear in the properties inspector (properties Window):


- Stroke Color Property
 - The pencil icon indicates the Stroke Color for the selected object and it can be found in the Tools Panel, the Property Inspector, and the Color Mixer.
 - Fill Color Property
 - The Paint Bucket icon indicates the Fill Color for the selected object and it can be found in the Tools Panel, the Property Inspector, and the Color Mixer.
Auto Shapes
We love the fact that Fireworks auto shapes have special diamond handles (the yellow points) that help change their properties proportionally.- Using Fireworks Auto Shape vectors you can create advanced shapes like the Sunflower, Snail, Rainbow, 3D Ring, etc. Try experimenting with these tools and have fun!
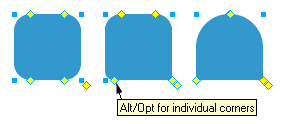
- Dome shaped vector: You can create a dome like vector shape using the rounded rectangle auto shape tool
 . See how we have done it step by step:
1. Draw a rounded rectangle.
2. Pull the top two handles towards each other till the center.
3. Pull the bottom two handles away from each other till the sides.Tip: Use Alt+Drag for changing the properties of individual corners.
How to Draw Curves
- Using Pen Tool
 you can draw smooth curves and straight lines by plotting points one by one. The beginners may find difficulty to draw a curve; it’s very easy to draw a curve using pen tool. The pen tool requires some practice before they feel totally comfortable.
 - Look at the example below. You will see how you can step by step create a uniform curve.
- Step 1: Click on rectangle and select one of its points using the Subselection Tool
 . While selecting the point a pop-up window will appear states that "Fireworks might tell you that the object is going to be ungrouped", click ok.
 - Step 2: Take the Pen Tool place a point (center) on the bottom line of the rectangle and drag (click+drag). The curve handles of the point will appear. Release the click.
- Step 3: To adjust the curve, just click the point just created and adjust the curve by clicking and dragging either of the curve handles.

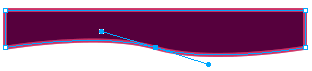

Now you have converted the rectangle to a neat curve.
How to Draw Cloud
- Using Pen Tool you can draw a cloud. The beginners may find difficulty to draw a cloud; it’s very easy to draw a cloud using pen tool. The pen tool requires some practice before they feel totally comfortable.
- To draw your cloud, select the Pen Tool from the Tool panel, first click on your document (workspace) with the Pen Tool and draw an arc. You will have two handles to adjust the arc. Now you need to click on the center point of the handles and again click and drag a point on the workspace. Repeat the above process and draw a stylish cloud. See the illustration below that will show how to draw a cloud.

How to edit a Gradient Fill
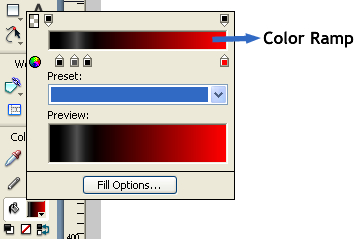
- You can edit the gradient fill by clicking any Fill Color box. Select an object that has a gradient fill or select a gradient fill from the Fill Options pop-up menu in the Property inspector. Click on the object with gradient fill, a set of handles appears on or near the object. Tip: You can drag these square handles to adjust the object’s fill. See the illustration below that will show how to adjust the gradient:


How to add a new color or opacity to the gradient fill:
- To add a color, click the area below the gradient color ramp.
- To add opacity, click the area above the gradient color ramp.
- To remove a color, drag the small color rectangle away from the Edit Gradient pop-up window. See the illustration below that will show how to add the color:
Software Required
Adobe Fireworks: Since this tutorial covers a core feature of Adobe Fireworks, any version of it will do.Compatible Versions of Fireworks for this Tutorial
Note: The features and instructions discussed in this tutorial are same across all Fireworks versions listed above; Screenshot images may differ. Recommended Version: Fireworks CS6