You Are Here ::: Home >> Dreamweaver Templates >> Template Customization Guide >> Dreamweaver Site Definition
Dreamweaver Site Definition
Setting up your template website in Dreamweaver
In this Dreamweaver Template customization step we are going to learn how to setup your web site in Dreamweaver.
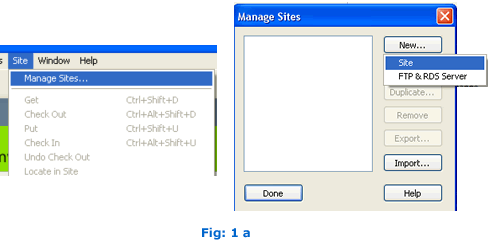
- Open Dreamweaver. Now click the Site>>Manage Sites (Site>>New Site for older version).
- A pop-up window will appear as shown below (Fig: 1 a).
- Click the New button and select the Site option.
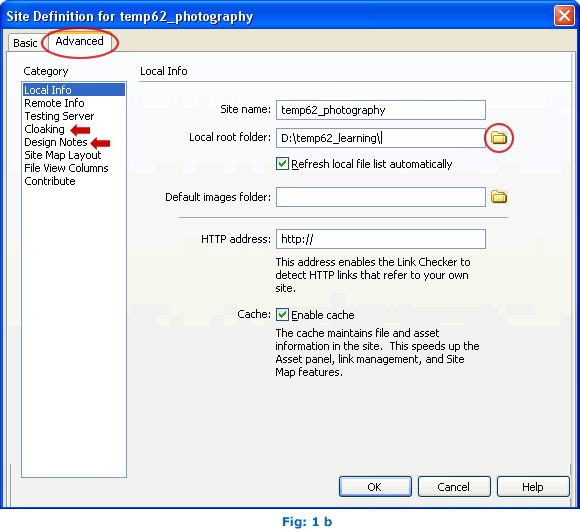
- A Site Definition pop-up window appears as shown below (Fig: 1 b). Now select the Advanced tab and fill in your site details.
- Enter your site name and use the folder icon to browse to the folder where your site files reside on your computer to set the Local root folder.
- For best performances, we recommend that Cloaking and Design Notes options are untick.
- Once you have defined your site. Now click the Ok button and Site Definition panel is complete. You are redirected to Manage Sites panel, click Done.
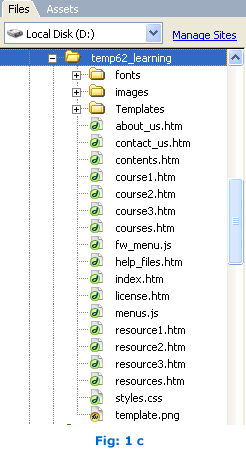
- You will see the template files displayed in the Files panel, as shown below (Fig: 1 c).
- The Files panel is usually displayed in the right hand side in Dreamweaver.
- After every changes in Dreamweaver template (only HTML file), test your site in a browser by selecting the File>>Preview in Browser>>iexplore (or F12).


SmartWebby.com Dreamweaver Template Customization Guide
- Step 1: Dreamweaver Site Definition - Setting up your template website in Dreamweaver
- Step 2: Custom Colors - Changing your dreamweaver template's design colors
- Step 3: Custom Header - Customizing the website header with your Site Name and Slogan
- Step 4: Custom Links - Modifying your website Links - Text links or Rollover links
- Step 5: Custom Footer - Changing the website's Footer Text
- Step 6: Custom Graphics - Replacing Photos and Images used in your template's design
- Step 7: Custom Content - Inserting Content into Existing Pages and Adding New Pages
- Step 8: Custom Styling Text - Changing your text styling using CSS Styles
- Custom Flyouts - Modifying your dreamweaver template's Drop-down Menus if included
- Custom Scroller - Customizing the News Scroller if included
- Custom Swaps - Customizing the Swap Images if included