Optimizing Masking Animations
How to optimize animations when masking pictures
In the following tutorial you'll learn how to optimize animations when masking pictures using Flash. As your expertise of Flash increases you will realize that all complicated animations are built up from many basic carefully created animations that work together to create a quality effect.
You Are Here ::: Home >> Free Tutorials >> Flash Tutorials >> Optimizing Masking AnimationsThis tutorial helps to learn some Flash optimization techniques when using photos. Here we have used 2 different masking effects.
- Import more than one image to the library, set canvas size according to the image dimension.
- Name the first layer as images, select 2 frames on this layer then press F7 or (right click >>Insert Blank Keyframe).
- Drag the images one by one at frame 1 and frame2.
- Then add new layer above 'images' layer name this layer as 'pic'.
- Select 2 frames from the 'images' layer and paste it over the 'pic' layer, (right click>>Reverse Frames).
- Go to (Insert >>New symbol...), from that popup, select graphic, name it as 'square', click ok.
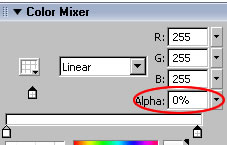
- Draw 10px X 10px linear rectangle, and then reduce that opacity like what we shown below.
Effect1: How to smoothly reduce alpha value
- Go to insert, create movie clip symbol 'effect1'.
- Drag 'square' from library.
- Press F6 or (right click >> Insert Keyframe) on 10th frame and extends that width up to your image width, select alpha from property panel then reduce that alpha to 0.
- Go to any frame between 1 to 10, (right click>>Create Motion Tween).
- Add new layer do the same process till your height of the image to be ended.
- Add 'action' layer above all the layer then press F6 or (right click>>Insert Keyframe) on 15th frame. Then press F9 ActionScript window will appear.Then copy and paste the following code:
_root.play(); - Then press F5 or (right click>>Insert frame)on 15th frame for all the layers.
Effect2: How to make colored effect from the same graphic symbol
- Go to insert, create 'effect2' movie clip symbol.
- Drag 'square' from library.
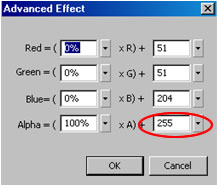
- Go to property panel, select tint from color pop up and change what color you want, select Advanced setting from that same pop up, then increase the alpha value like what we shown below.
- Then do the same process what explained in 'effect1'.
- Go to scene 1, add new layer 'mask' above that 'pic' layer.
- Drag 'effect1', 'effect2' from library at frame 1 and 2 respectively.
- Duplicate the 'mask' layer as 'movie' layer.
- Add 'action layer' above the 'movie' layer, then press F9, copy and paste the following code:
stop(); - Apply mask for 'mask' and 'pic' layer .
- Save and test the movie press (Ctrl+Enter).
Software Required
Compatible Versions of Flash for this Tutorial
Flash CS5 Professional | Flash CS4 Professional
Note: For uses of lower versions of Flash some visual interface images would differ.
Recommended Version: Adobe Flash CS5 Professional
In the following Flash tutorials you'll learn how to create cool flash effects using simple techniques like tweening, masking, etc.:
- Basic Effects : Fade-in Fade-out Effect, Zooming Effect and Alpha Ripple Effect
- Photo Effects : Simple Photo Masking, Motion Photo Masking and Smooth Fade Photo Masking
- Special Effects : Outline Effect, Shape Hint Flash Effect and Sinewave Background Effect
- Text Effects : Cool Text Effects